Learn how to use Model forms in Django
Part two of getting started with Django forms

Software Engineer
This is the second part of the "getting started with Django forms" series. In the first part of the series, I have covered
- an overview of Django forms
- two different types of form offered by Django
- an overview of Django forms.Form
- a use-case of forms.Form
read about the first part here
In this part, I will discuss the Django Model Forms. It's a use-case and an implementation of it.
PS. I will be using the same project that I have created in the first part
Let's get started!
An overview of ModelForm
The first part approach of creating a form in Django is highly flexible and gives more control to you. But as mentioned in the first part, forms.Form is suitable only if you do not want to interact with the database (or a model). If you need to store the data in the database, say a blog, then first, you have to define a model for it, the model will have different information that you need such as database table field attributes ( such as id, title, body and so on), help texts, etc. Since the model itself has such attributes then defining this information again in a form is like making code redundant. That is why, if you are creating an app that uses a database then you may want to use a model form (forms.ModelForm) instead of the normal form (forms.Form) because ModelForm lets you create a Form class from a Django model.
Working with a Model Form
I have created a new app called working_with_modelform within the same Django project. Now, the file structure looks like this:
.
└── WORKING_WITH_FORMS/
    ├── form_without_model/
    ├── working_with_forms/
    ├── working_with_modelform/ # new app
    ├── db.sqlite3
    └── manage.py
Now that a new app has been started, let Django know about it, by listing the app within the INSTALLED_APPS of the settings. py file. My latest version of installed_apps looks like this -
INSTALLED_APPS = [
    'django.contrib.admin',
    'django.contrib.auth',
    'django.contrib.contenttypes',
    'django.contrib.sessions',
    'django.contrib.messages',
    'django.contrib.staticfiles',

    'form_without_model.apps.FormWithoutModelConfig',
    'working_with_modelform.apps.WorkingWithModelformConfig', # added app here
]
Model
let's create a model to store simple blog posts.
working_with_modelform/models.py
from django.db import models

# Create your models here.
class BlogPost(models.Model):
    title = models.CharField(max_length=255)
    body = models.TextField()
    created_on = models.DateField(auto_now=True)
here, I am avoiding registering the model to admins.py, as our concern here is to interact with the database through a custom model form.
Now that our model is ready, let's run the migrations and migrate command
python manage.py makemigrations
python manage.py migrate
Form
Now, our next would be to create a form. And just like part one, I will a new file inside working_with_modelform and will name it forms.py. Within the working_with_modelform/forms.py, create a new model form as:
working_with_modelform/forms.py,
from django.forms import ModelForm

from .models import BlogPost

class CreateBlogPostModelForm(ModelForm):

    class Meta:
        model = BlogPost
        # fields = '__all__'   # Bad Approach
        fields = ['title', 'body']  # Good approach
As you can see in the above CreateBlogPostModelForm, I have not defined model fields, here again, instead, I am telling Django that render the 'title' and the 'body' fields of the BlogPost model that I have defined on working_with_modelform/models.py file. Note that you can use all the fields defined in a model by mentioning 'all' in the field attribute, however, this should be avoided because then if you add any field in the model will be added automatically in the form too without your knowledge and this can create some security issues.
Views
Now that a very simple model form is ready, let's write a view for it so that we can render the form in the browser. Got to working_with_modelform/views.py and add the following:
from django.forms import ValidationError
from django.shortcuts import render

from .forms import CreateBlogPostModelForm

# Create your views here.
def create_blog_view(request):
    """
    check if it is a POST request. If it is a post request
    then populate the form and check if the form is valid or not, if the form is valid then
    directly save() the form and redirect to home, for any request method other
    than POST re-render the blank form.
    """
    if request.method == "POST":
        form = CreateBlogPostModelForm(request.POST)
        if form.is_valid():
            form.save()

        else:
            raise ValidationError("Invalid form")
    else:
        form = CreateBlogPostModelForm()

    return render(request, "create_blog_post.html", {'form': form})
The logic of this form is the same as we have seen in the first part. Unlike, the first part here I am saving the form in the database if the form is valid. The model form is time-saving if you have many fields in the model. Here, if I had used forms.Form then I would have to repeat the model fields three times.
Let us define two more views to see the listing of created blog posts and the detailed post. Add the following the same file as the above view, the working_with_modelform/views.py file should be like this:
from django.forms import ValidationError
from django.shortcuts import get_object_or_404, render, redirect

from .forms import CreateBlogPostModelForm
from .models import BlogPost # imported this

# Create your views here.
def create_blog_view(request):
    """
    check if it is a POST request. If it is a post request
    then populate the form and check if the form is valid or not, if the form is valid then
    directly save() the form, for any request method other than POST re-render the blank
    form.
    """
    if request.method == "POST":
        form = CreateBlogPostModelForm(request.POST)
        if form.is_valid():
            form.save()
            return redirect('list-posts') # dynamic url accessing through namespace
        else:
            raise ValidationError("Invalid form")
    else:
        form = CreateBlogPostModelForm()

    return render(request, "create_blog_post.html", {'form': form})


def get_blog_posts_list_view(request):
    """
    get the listing of id, the title of all the available posts
    """
    # posts = BlogPost.objects.all() # not an efficient code

    # fetch titles, and ids only
    posts = BlogPost.objects.all().values('id', 'title')
    return render(request, 'homepage.html', {'posts': posts})


def get_detailed_blog_post(request, id):
    """
    get the detailed post
    """
    if request.method == 'GET':
        # post = BlogPost.objects.get(id=id)

        # raise 404 if the post with id does not exist
        post = get_object_or_404(BlogPost, id=id)  # recommended

        return render(request, 'detailedpage.html', {'post': post} )
Note that I have called a function get_object_or_404(). It will return a 404 error if the post with the given 'id' does not exist. It takes two arguments the first one is the model name, and the other one is the 'pk' or any unique field.
URLs
Even though it is a good practice to de-couple things in any project, I am being lazy here, creating all URLs in the same place at working_with_forms/urls.py. The URLs file looks like this:
from django.contrib import admin
from django.views.generic.base import TemplateView
from django.urls import path

from form_without_model.views import contact_us_view
from working_with_modelform.views import (
    create_blog_view,
    get_blog_posts_list_view,
    get_detailed_blog_post
)


urlpatterns = [
    path('', TemplateView.as_view(template_name='index.html')),
    path('admin/', admin.site.urls),
    path('form-without-model/', contact_us_view),
    # part II
    path('posts/home/', get_blog_posts_list_view, name='list-posts'),
    path('posts/create/', create_blog_view, name='create-post'),
    path('posts/<int:id>/', get_detailed_blog_post, name='detail-post')
]
To avoid the hardcoded URLs, I have used the 'name' parameter in the 'path' of the 'urlpatterns'. Learn more about URL namespacing from here
Templates
As per the views, three templates are required. As mentioned above, we should keep project files de-coupled, but I have created a new directory namely templates at working_with_modelform and withinworking_with_modelform/templates/ directory I have created homepage.html, create_blog_post.html, detailedpage.html. The file structure looks like this:
.
└── WORKING_WITH_FORMS/
    ├── form_without_model/
    ├── working_with_forms/
    ├── working_with_modelform/
    │   ├── migrations/
    │   ├── templates/ # newly created
    │   │   ├── create_blog_post.html
    │   │   ├── detailedpage.html
    │   │   └── homepage.html
    │   ├── __init_.py
    │   ├── admin.py
    │   ├── apps.py
    │   ├── forms.py
    │   ├── models.py
    │   ├── tests.py
    │   └── views.py
    ├── db.sqlite3
    └── manage.py
The templates look like this:
create_blog_post.html:
<!DOCTYPE html>
<html lang="en">
<head>
    <meta charset="UTF-8">
    <meta http-equiv="X-UA-Compatible" content="IE=edge">
    <meta name="viewport" content="width=device-width, initial-scale=1.0">
    <title>Document</title>
</head>
<body>
    <form method="POST">
        {% csrf_token %}

        {{ form.as_p }}

        <button type="submit">Save</button>
    </form>
</body>
</html>
Make sure you put the {% csrf_token %} within in
tag whenever defining a post method. Otherwise, Django will throw a FORBIDDEN error (403)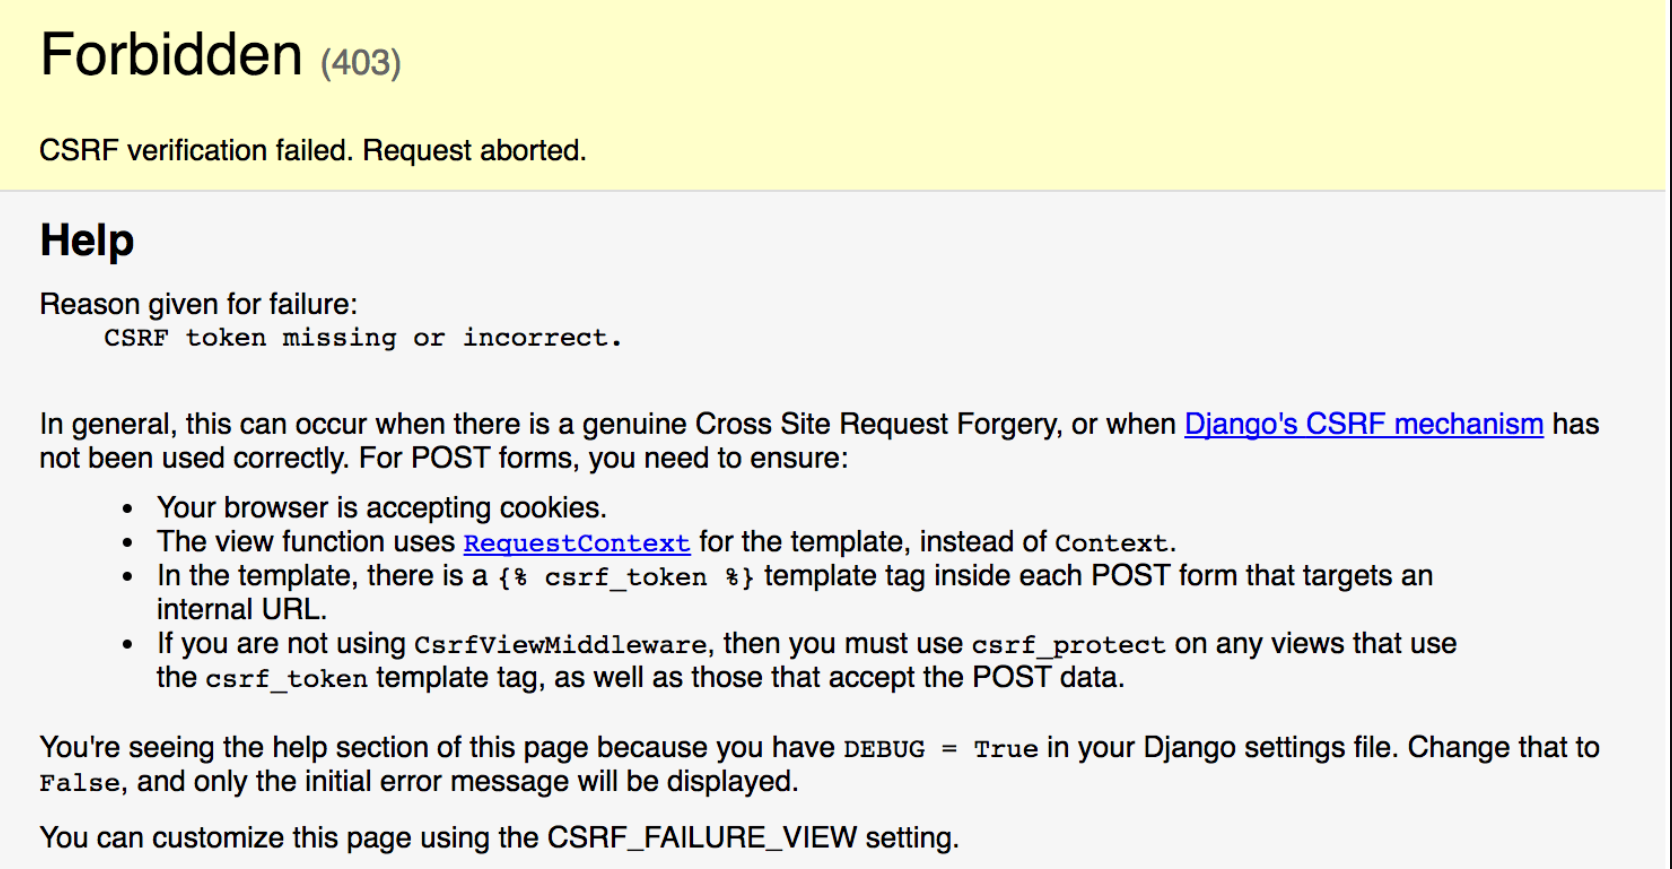 Learn more about CSRF TOKEN here
homepage.html
<!DOCTYPE html>
<html lang="en">
<head>
    <meta charset="UTF-8">
    <meta http-equiv="X-UA-Compatible" content="IE=edge">
    <meta name="viewport" content="width=device-width, initial-scale=1.0">
    <title>Document</title>
</head>
<body>
    <h2>Listing of Blog posts here</h2>
    {% for post in posts %}
        <a href="{% url 'detail-post' post.id %}">
            <div>{{ post.title }}</div>
        </a>
    {% endfor %}
</body>
</html>
Nothing complex so far just a dynamic namespacing
detailedpage.html
<!DOCTYPE html>
<html lang="en">
<head>
    <meta charset="UTF-8">
    <meta http-equiv="X-UA-Compatible" content="IE=edge">
    <meta name="viewport" content="width=device-width, initial-scale=1.0">
    <title>Document</title>
</head>
<body>
    <h2>this is detail page</h2>
    {% if post %}
        <p>{{ post.title }}</p>

        <p>{{ post.body }} </p>
    {% endif %}
</body>
</html>
Result
On gitting the url 127.0.0.1:8000/post/create/ you can create the blog posts as:
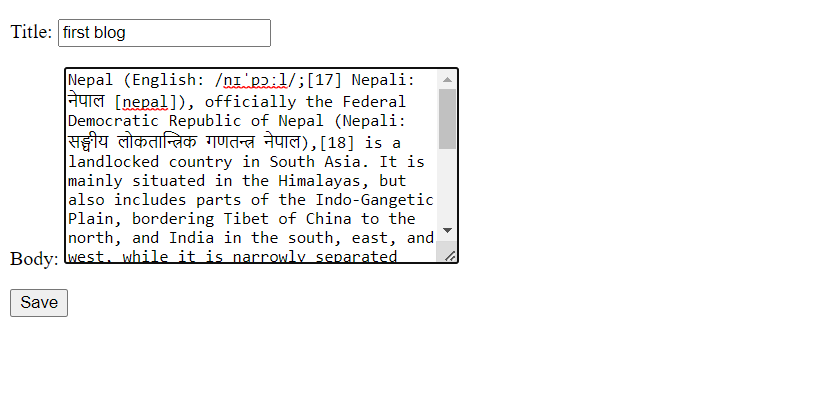
Similarly, I have added one more post. Listings of the created blogs can be accessed through 127.0.0.1:8000/post/home/

Once you click on the titles, you will be redirected to the detailed page

In this way, you can implement the Django ModelForm.
Bonus
We can go a step further, and make a couple of changes to our model form for customization. Let us modify the CreateBlogPostModelForm to rename the model field title to heading, and add help texts to each form field. The updated form should look like this:
working_with_modelform/forms.py
from django.forms import ModelForm
from django.utils.translation import gettext_lazy as _  # import translator

from .models import BlogPost

class CreateBlogPostModelForm(ModelForm):

    class Meta:
        model = BlogPost
        # fields = '__all__'   # Bad Approach
        fields = ['title', 'body']  # Good approach

        # added in Bonus section of part II

        # form renames title to heading but in the model
        # it remains title
        labels = {'title': _('Heading')}

        # add help texts for title and body
        help_texts = {
            'title': _('Give your blog post a suitable heading'),
            'body': _('Write the content of the blog')
        }
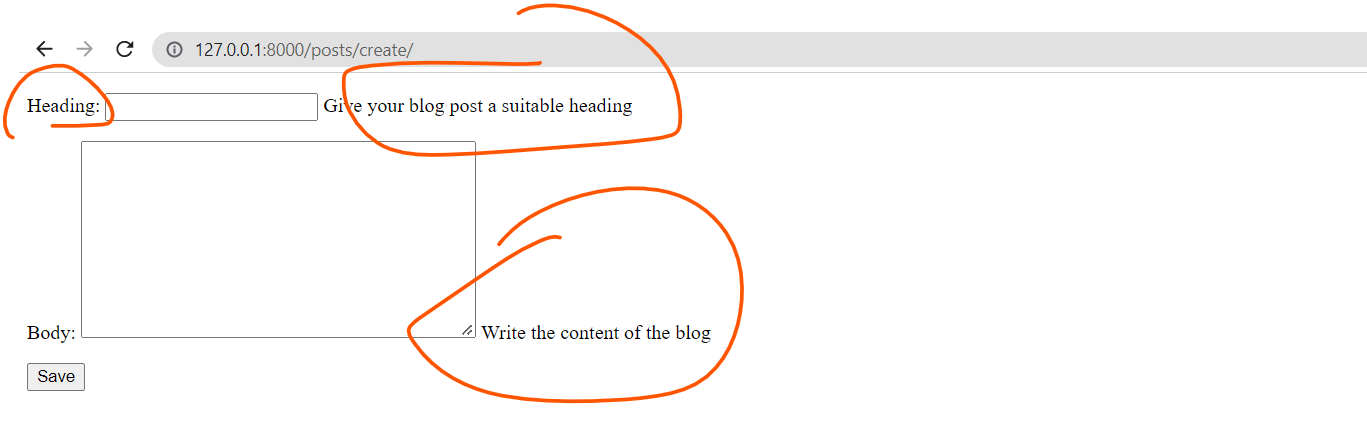
As you can see, the 'title' has been changed to 'heading' and both fields have help texts as defined in the above form.
That's it for this Part. In the next part of the series, we will look at how we can validate forms.
In case you need the source code of this entire series, here is the GitHub link source code